
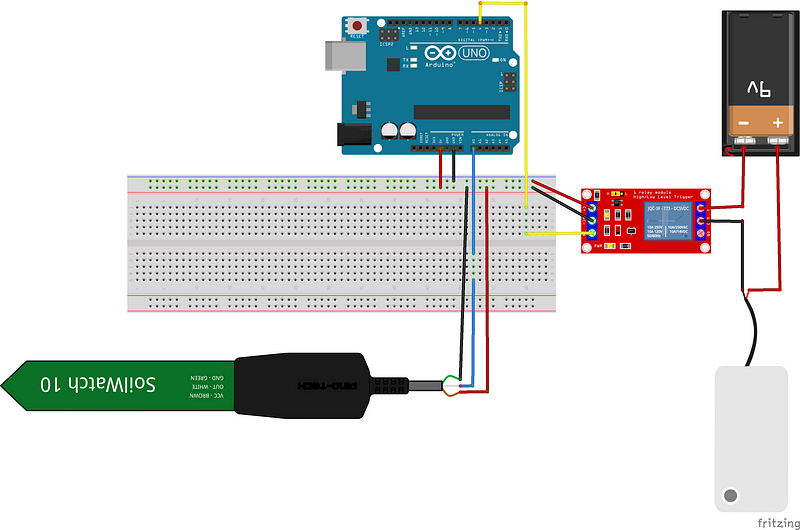
In the last article, we built a fully automatic watering system with an Arduino, a capacitive soil sensor, a relay, and a water pump.
Plants require not only the right amount of water but also an optimal environment with the correct temperature and humidity levels to grow healthy and strong. In this advanced tutorial, I will show you how to build a fully automatic irrigation system for your plants using an ESP8266 module, a capacitive soil moisture sensor, a relay, and a DHT22 sensor. You will be able to access the sensor data directly through your browser without the need for a separate app.
What You’ll Need
Before you start building your fully automatic irrigation and environmental monitoring system, make sure you have the following materials:
- ESP8266 module (such as ESP-01 or NodeMCU)
- Capacitive soil moisture sensor
- Relay
- DHT22 sensor
- 5V water pump
Step 1: Assembling the Electronics
The first step is to connect the electronic components together. You will need a capacitive soil moisture sensor, a relay, a DHT22 sensor, and the ESP8266 module. Connect them as follows:

Step 2: Programming
To read the sensor data and create the web server, we need the corresponding code. Download the required libraries and upload the following code to your ESP8266 module:
#include <Adafruit_Sensor.h>
#include <DHT.h>
#include <ESP8266WiFi.h>
#include <ESP8266WebServer.h>

#define DHTPIN 3          // Digital pin connected to the DHT22
#define DHTTYPE DHT22     // The type of DHT sensor being used

const char* ssid = "YOUR_WIFI_SSID";      // SSID of your Wi-Fi network
const char* password = "YOUR_WIFI_PASSWORD";  // Password of your Wi-Fi network

const int sensorPin = A0; // Analog input pin for the soil moisture sensor
const int relayPin = D4; // Output pin for the relay
const int dryValue = 500; // Threshold value for dry soil; adjust as needed

DHT dht(DHTPIN, DHTTYPE);
ESP8266WebServer server(80);

void handleRoot() {
  float humidity = dht.readHumidity();
  float temperature = dht.readTemperature();

  if (isnan(humidity) || isnan(temperature)) {
    Serial.println("Error reading DHT sensor!");
    server.send(200, "text/plain", "Error reading sensor");
    return;
  }

  int sensorValue = analogRead(sensorPin);

  String response = "Humidity: " + String(humidity) + "%\n"
                    + "Temperature: " + String(temperature) + "°C\n"
                    + "Soil Moisture: " + String(sensorValue);

  server.send(200, "text/plain", response);
}

void setup() {
  Serial.begin(115200);
  dht.begin();
  WiFi.begin(ssid, password);

  while (WiFi.status() != WL_CONNECTED) {
    delay(500);
    Serial.print(".");
  }

  Serial.println("");
  Serial.println("Wi-Fi connected");

  server.on("/", handleRoot);

  server.begin();
  Serial.println("Server started");
  Serial.print("IP address: ");
  Serial.println(WiFi.localIP());
}

void loop() {
  server.handleClient();

  float humidity = dht.readHumidity();
  float temperature = dht.readTemperature();

  if (isnan(humidity) || isnan(temperature)) {
    Serial.println("Error reading DHT sensor!");
    return;
  }

  int sensorValue = analogRead(sensorPin);

  Serial.print("Humidity: ");
  Serial.print(humidity);
  Serial.print("%\t");
  Serial.print("Temperature: ");
  Serial.print(temperature);
  Serial.print("°C\t");
  Serial.print("Soil Moisture: ");
  Serial.println(sensorValue);

  if (sensorValue < dryValue) { // If soil is too dry
    digitalWrite(relayPin, LOW); // Turn on the relay
    Serial.println("Pump ON"); // Print pump status
    delay(10000); // Wait for 10 seconds
  } else {
    digitalWrite(relayPin, HIGH); // Turn off the relay
    Serial.println("Pump OFF"); // Print pump status
  }

  delay(10000);  // Wait for 10 seconds
}
Make sure to replace “YOUR_WIFI_SSID” and “YOUR_WIFI_PASSWORD” with the appropriate credentials for your Wi-Fi network.
Step 3: Data Retrieval via Browser
Once your ESP8266 module is connected to your Wi-Fi network, you can access the sensor data through your browser. Simply go to the IP address displayed in the Serial Monitor. You should see a webpage displaying the current humidity, temperature, and soil moisture data.
Step 4: Installation
Mount the circuit in your greenhouse and connect the water pump to a water source. Ensure that the capacitive soil moisture sensor is placed near the roots of your plants. You can enclose the circuit in a protective casing to shield it from moisture.
Step 5: Enjoy Your Fully Automatic Irrigation and Environmental Monitoring System
Now you have successfully built a fully automatic watering and environmental monitoring system using the ESP8266 module. Your plants will now receive the right amount of water, and you can monitor the humidity, temperature, and soil moisture data directly from your browser. Sit back, relax, and watch your plants thrive in their optimal environment.
Have fun with your fully automated irrigation and environmental monitoring system using the ESP8266!
If you have any questions, feel free to contact me. If you like my work, feel free to check out my other articles on similar topics.
Schreibe einen Kommentar