
Some time ago I found an Advent calendar, which should play every day a different song. When I looked at the components for it I thought to myself, hey I have, except for one part everything here. I ordered the missing part for a few euros and began to assemble everything. In the end, disillusionment… due to the poorly described instructions and errors in the code, I sat for several hours over days on a project, which should be done in a few hours. I searched the Internet for instructions on all components and finally managed to get the electronics running. In this article, I want to make a detailed tutorial for a very interesting Arduino project available for everyone. Due to the simplicity of the setup, the project should be possible even for beginners.
To make an audio advent calendar you need the following components:
- Arduino nano
- Jumper cable
- RTC module
- JQ 6500 Serial (only possible to order from china)
- Speaker (from old speakers)
- 9V connection cable
- On/Off switch
- 9V block battery
Electronics assembly
First, you should connect the individual components step by step with a plug-in board and jumper cables and test everything together. Afterward, the components can still be soldered together or mounted on a board.
To save nerves, this should be done only when everything works perfectly, otherwise soldered errors in the wiring can cost a lot of nerves.
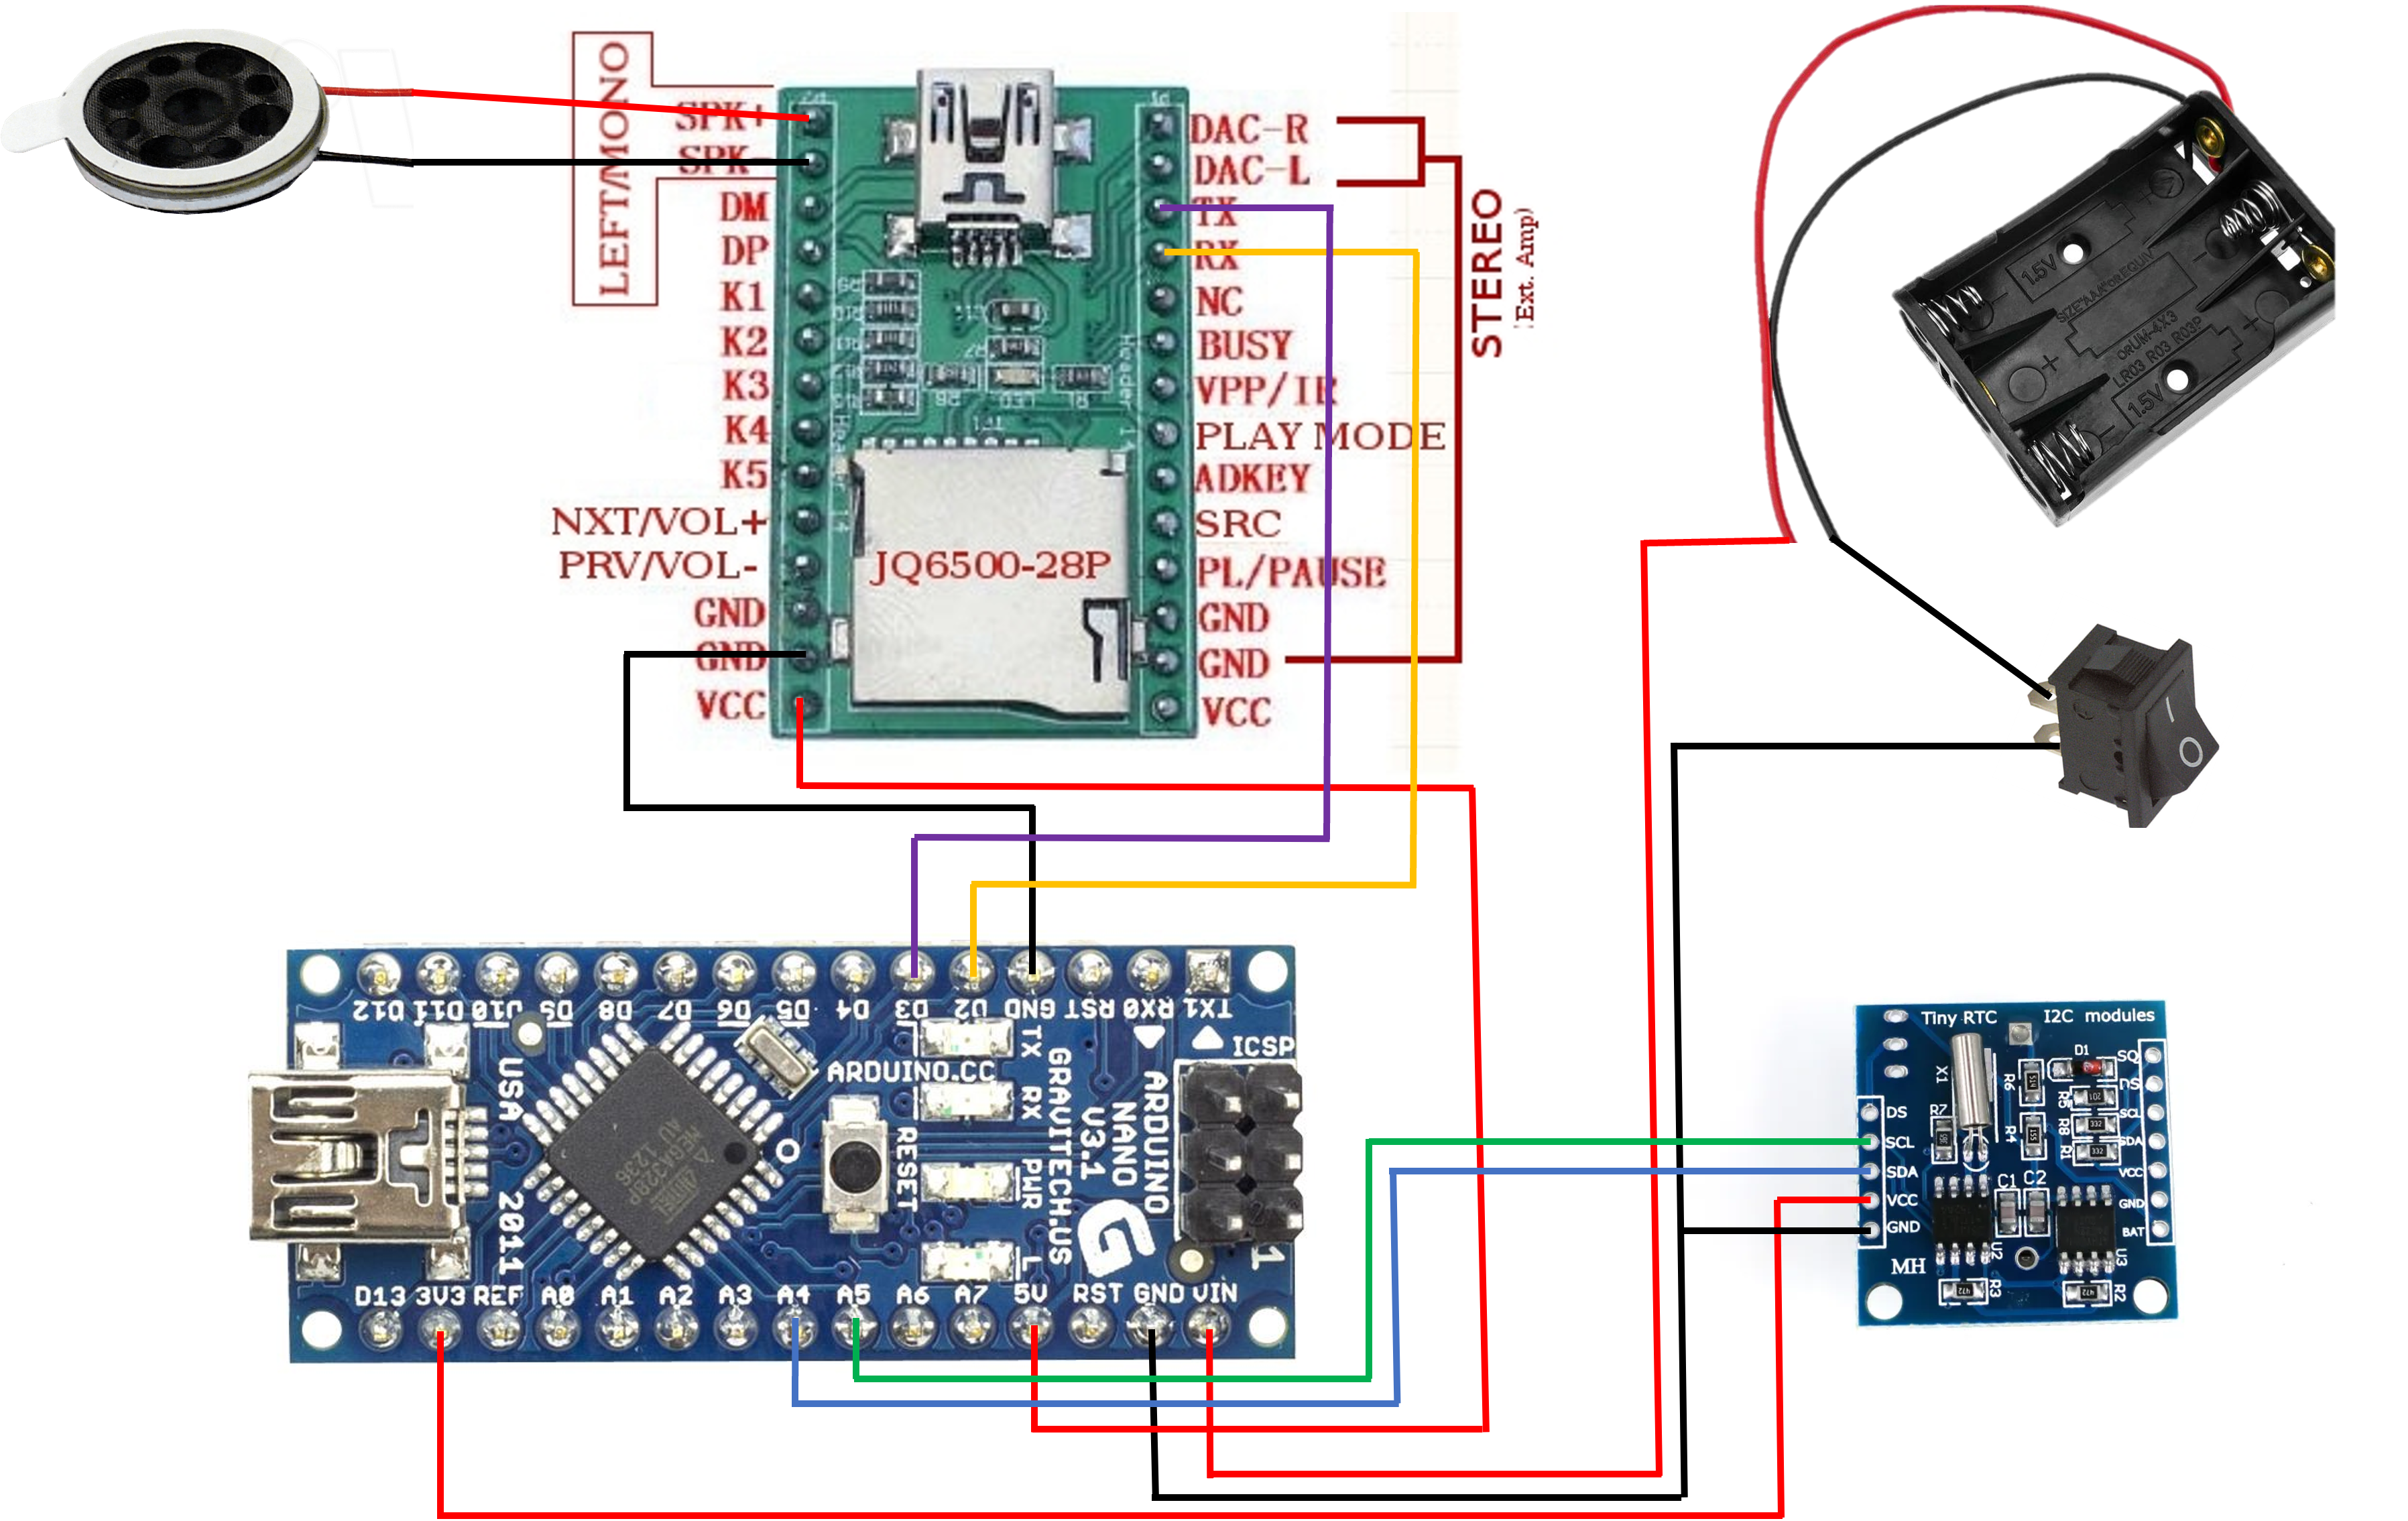
The components should be connected as shown in the following diagram.
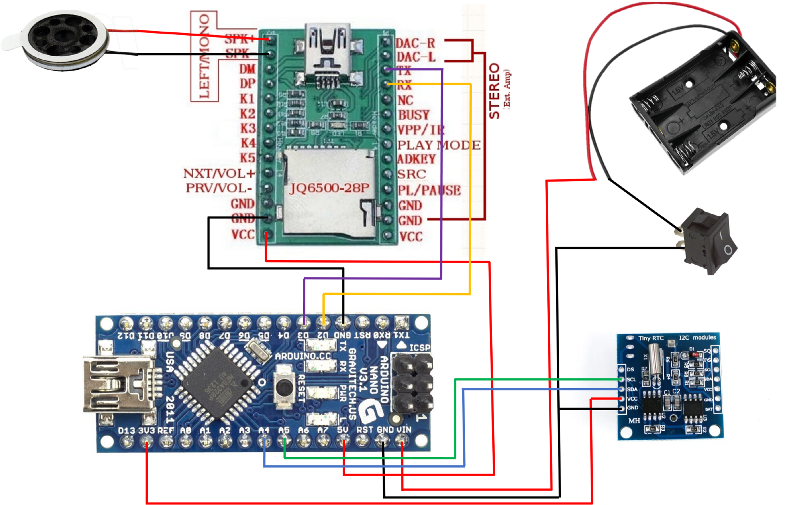
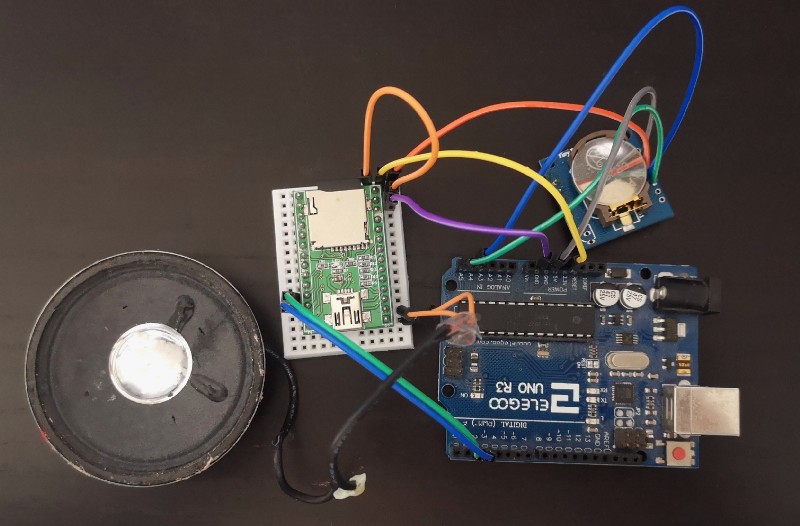
It is important to check each cable rather three times, to avoid a later search for error causes. The final result may look like this. (The on/off switch was added later)
Software
A Real Time Clock is connected to the Arduino so the Arduino knows what day or time it is when it is started. This has a battery, with the help of which the time can be stored, even if the Arduino is no longer connected to the power.
Therefore, the first step before uploading the actual ArduRaino script is to set the time on the RTC module. The following code can be used for this, you only have to change the current time:
#include "Wire.h"
#define DS3231_ADDRESSE 0x68
void setup() {
  Wire.begin();
  Serial.begin(9600);
  // current time sek min hr wd day mon year
  setDS3231zeit(0, 29, 16, 20, 24,  10,  22);
}
void loop() {
  showtime(); // export time
  delay(1000); // every second
}
void setDS3231zeit(byte second, byte minute, byte hour, byte weekday, byte day, byte month, byte year) {
  // set Date and Time
  Wire.beginTransmission(DS3231_ADDRESSE);
  Wire.write(0);
  Wire.write(decToBcd(second)); // set seconds
  Wire.write(decToBcd(minute)); // set minutes
  Wire.write(decToBcd(hour));
  Wire.write(decToBcd(weekday)); // 1=Sunday ... 7=Saturday
  Wire.write(decToBcd(day));
  Wire.write(decToBcd(month));
  Wire.write(decToBcd(year)); // 0...99
  Wire.endTransmission();
}
void leseDS3231zeit(byte *second, byte *minute,byte *hour, byte *weekday, byte *day, byte *month, byte *year) {
  Wire.beginTransmission(DS3231_ADDRESSE);
  Wire.write(0); // DS3231 register to 00h
  Wire.endTransmission();
  Wire.requestFrom(DS3231_ADDRESSE, 7); // Get 7 byte data from DS3231
  *second = bcdToDec(Wire.read() & 0x7f);
  *minute = bcdToDec(Wire.read());
  *hour = bcdToDec(Wire.read() & 0x3f);
  *weekday = bcdToDec(Wire.read());
  *day = bcdToDec(Wire.read());
  *month = bcdToDec(Wire.read());
  *year = bcdToDec(Wire.read());
}
void showtime(){
byte second, minute, hour, weekday, day, month, year;
  leseDS3231zeit(&second, &minute, &hour, &weekday, &day, &month, &year);   // Get data from DS3231
  if (day < 10) { Serial.print("0");}
  Serial.print(day); // ausgeben T.M.J H:M:S
  Serial.print(":");
  if (month < 10) { Serial.print("0");}
  Serial.print(month);
  Serial.print(":20");
  Serial.print(year);
  Serial.print(" ");
  if (hour < 10) { Serial.print("0");}
  Serial.print(hour, DEC); // byte in decimal for output
  Serial.print(":");
  if (minute < 10) { Serial.print("0");}
  Serial.print(minute, DEC);
  Serial.print(":");
  if (second < 10) { Serial.print("0"); }
  Serial.println(second, DEC);
}
byte decToBcd(byte val) {
// Convert decimal number to binary coded decimal (BCD)
  return((val/10*16) + (val%10));
}
byte bcdToDec(byte val) {
// Convert BCD (binary coded decimal) to decimal number
  return((val/16*10) + (val%16));
}
Afterward, the actual script can be loaded onto the Arduino, with the help of which we can perform a test of the entire setup. The Arduino will first request the exact date and time from the RTC module through the script. Then, depending on which minute the clock indicates, the MP3 file is played by the MP3 player module (JQ Serial 6500). If it is for example 12:30 o’clock, the MP3 file “030” is played. If you store different MP3 files, every minute something different will be played. How the storing of the MP3 files works, I describe in the following.
The script to test the function is as follows:
#include "Wire.h"
#include <SoftwareSerial.h>
#include <JQ6500_Serial.h>
#define DS3231_ADDRESSE 0x68
JQ6500_Serial mp3(3,2); //create an mp3 object
void setup() {
  Wire.begin();
  Serial.begin(9600);
  Serial.println("Audio Advent Calendar by Nils");
  Serial.println("----");
//setup mp3
    mp3.begin(9600);
  mp3.reset();
  delay(500);
    Serial.println("mp3");
  mp3.setVolume(80);
  mp3.setLoopMode(MP3_LOOP_NONE);
  Serial.println("volume");

}
void loop() {
delay(1000); // every second
byte seconds, minute, hour, weekday, day, month, year;
  readDS3231time(&seconds, &minute, &hour, &weekday, &day, &month, &year);   // import data of DS3231 (Real Time Clock)
byte stat = mp3.getStatus();
  if(stat != MP3_STATUS_PLAYING) {
    if (day < 100){
      if (month < 13) {
Serial.print("playing track Number: ");
        Serial.print("Day: ");
        Serial.println(minute);
        mp3.playFileNumberInFolderNumber(month, minute);
//        mp3.play();
      }
      else{
        Serial.println("not an advent day");
        delay(100);
        exit(0);
      }
    }
  }
}
void readDS3231time(byte *seconds, byte *minute,byte *hour, byte *weekday, byte *day, byte *month, byte *year) {
  Wire.beginTransmission(DS3231_ADDRESSE);
  Wire.write(0); // DS3231 Register zu 00h
  Wire.endTransmission();
  Wire.requestFrom(DS3231_ADDRESSE, 7); // 7 Byte import data of DS3231 (Real Time Clock)
*seconds = bcdToDec(Wire.read() & 0x7f);
  *minute = bcdToDec(Wire.read());
  *hour = bcdToDec(Wire.read() & 0x3f);
  *weekday = bcdToDec(Wire.read());
  *day = bcdToDec(Wire.read());
  *month = bcdToDec(Wire.read());
  *year = bcdToDec(Wire.read());
}
void zeigetime(){
byte seconds, minute, hour, weekday, day, month, year;
  readDS3231time(&seconds, &minute, &hour, &weekday, &day, &month, &year);   // import data of DS3231 (Real Time Clock)
if (day < 10) { Serial.print("0");}
  Serial.print(day); // ausgeben T.M.J H:M:S
  Serial.print(":");
  if (month < 10) { Serial.print("0");}
  Serial.print(month);
  Serial.print(":20");
  Serial.print(year);
  Serial.print(" ");
  if (hour < 10) { Serial.print("0");}
  Serial.print(hour, DEC); // byte in decimal for output
  Serial.print(":");
  if (minute < 10) { Serial.print("0");}
  Serial.print(minute, DEC);
  Serial.print(":");
  if (seconds < 10) { Serial.print("0"); }
  Serial.println(seconds, DEC);
}
byte decToBcd(byte val) {
// Convert decimal number to binary coded decimal (BCD)
  return((val/10*16) + (val%10));
}
byte bcdToDec(byte val) {
// Convert BCD (binary coded decimal) to decimal number
  return((val/16*10) + (val%16));
}
To test whether our setup works, we still need music that can be played. For this, the songs must be transferred to the micro SD card in a certain folder structure. For testing, a folder should be created that is named in the current number of the month. In this example, the month is October (10). It is important that for example the month of June is named “06” and not as “6”. In the folder now any MP3 can be stored, which is named after a minute. (000, 001, 002, …)
After the Micro SD card is plugged back into the JQ6500 Serial Modul, you can test for the first time if everything works. If you power up the Arduino Nano now, the song with the number of the respective minute should sound over the speakers.
If this worked, everything should be disconnected from power for a few minutes and tested again if another song is played. This ensures that even without the external power connection, the Real Time Clock continues to run from the battery and the Arduino can tell the new time when it starts up.
From this point on, the setup is fully functional. If this is not to be used as an Advent Calendar, the next step can be skipped and proceed directly to Part 2, in which I write how I design and print the box for the advent calendar in Fusion 360.
If you want an advent calendar, the final script can now be uploaded. This way the Arduino checks at startup which day it is and not which minute. It also checks if it is December, so the desired songs are only played from December 01 to 24 and not in other months.
Final Arduino code:
#include "Wire.h"
#include <SoftwareSerial.h>
#include <JQ6500_Serial.h>
#define DS3231_ADDRESSE 0x68
JQ6500_Serial mp3(3,2); //create an mp3 object
void setup() {
  Wire.begin();
  Serial.begin(9600);
  Serial.println("Audio Advent Calendar by Nils");
  Serial.println("----");
//setup mp3
    mp3.begin(9600);
  mp3.reset();
  delay(500);
    Serial.println("mp3");
  mp3.setVolume(80);
  mp3.setLoopMode(MP3_LOOP_NONE);
  Serial.println("volume");
}

void loop() {
delay(1000); // jede seconds
byte seconds, minute, hour, weekday, day, month, year;
  readDS3231time(&seconds, &minute, &hour, &weekday, &day, &month, &year);   // import data of DS3231 (Real Time Clock)
byte stat = mp3.getStatus();
  if(stat != MP3_STATUS_PLAYING) {
    if (day < 25){
      if (month == 12) {
Serial.print("playing track Number: ");
        Serial.print("Day: ");
        Serial.println(day);
        mp3.playFileNumberInFolderNumber(month, day);
//        mp3.play();
      }
      else{
        Serial.println("not an advent day");
        delay(100);
        exit(0);
      }
    }
  }
}
void readDS3231time(byte *seconds, byte *minute,byte *hour, byte *weekday, byte *day, byte *month, byte *year) {
  Wire.beginTransmission(DS3231_ADDRESSE);
  Wire.write(0); // DS3231 Register zu 00h
  Wire.endTransmission();
  Wire.requestFrom(DS3231_ADDRESSE, 7); // 7 Byte import data of DS3231 (Real Time Clock)
*seconds = bcdToDec(Wire.read() & 0x7f);
  *minute = bcdToDec(Wire.read());
  *hour = bcdToDec(Wire.read() & 0x3f);
  *weekday = bcdToDec(Wire.read());
  *day = bcdToDec(Wire.read());
  *month = bcdToDec(Wire.read());
  *year = bcdToDec(Wire.read());
}
void zeigetime(){
byte seconds, minute, hour, weekday, day, month, year;
  readDS3231time(&seconds, &minute, &hour, &weekday, &day, &month, &year);   // import data of DS3231 (Real Time Clock)
if (day < 10) { Serial.print("0");}
  Serial.print(day); // ausgeben T.M.J H:M:S
  Serial.print(":");
  if (month < 10) { Serial.print("0");}
  Serial.print(month);
  Serial.print(":20");
  Serial.print(year);
  Serial.print(" ");
  if (hour < 10) { Serial.print("0");}
  Serial.print(hour, DEC); // byte in decimal for output
  Serial.print(":");
  if (minute < 10) { Serial.print("0");}
  Serial.print(minute, DEC);
  Serial.print(":");
  if (seconds < 10) { Serial.print("0"); }
  Serial.println(seconds, DEC);
}
byte decToBcd(byte val) {
// Convert decimal number to binary coded decimal (BCD)
  return((val/10*16) + (val%10));
}
byte bcdToDec(byte val) {
// Convert BCD (binary coded decimal) to decimal number
  return((val/16*10) + (val%16));
}
If you want to read how I design and print the box for the advent calendar in Fusion 360 and assembling follow me and read it in the next article.
If you have any questions, feel free to contact me.
Schreibe einen Kommentar