
In the last part, we learned that due to the large community there are many 3D objects that can be downloaded for free. The downloaded 3D models are usually saved as STL files, but 3mf or obj files are also possible. The following steps can be performed with all file types.
In order to be able to print a 3D object, you need software that converts the 3D model into a software code (GCODE) that the 3D printer can use. This process is called slicing. A code is created that contains all the X, Y, and Z coordinates that the printer travels over to print the object.
Probably the most used free software to do this is Cura. The program can be downloaded and installed from the official website.
Below, I’ll give a brief overview of essential setting options in Cura to slice your 3D object so that you get the best possible print. Please note that your 3D printer only executes a code and does not make specific settings based on a 3D object. Good print quality can therefore only be produced if the correct settings are specified in the software beforehand.
General:
When opening Cura for the first time, it is expected that you first specify the properties of your printer. In the case of well-known 3D printers such as Ultimaker, there are direct templates that only need to be selected; in the other case, data such as the size of the print bed and nozzle size must be entered. After that, you can already start.
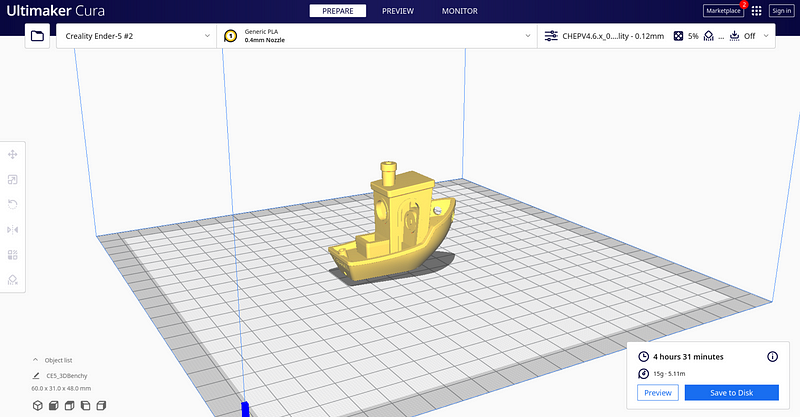
Cura is relatively simple. You can drag and drop your STL file, which you have selected and downloaded from Thingiverse as in the previous part, into cura. Using the Benchy Boat as an example, the whole thing should look something like this. You are now in the “Prepare” area, where a preview of the model is displayed.
Afterwards you have to enter the settings for the print, which I will explain in the following. These are displayed by clicking on the area in the upper right corner.
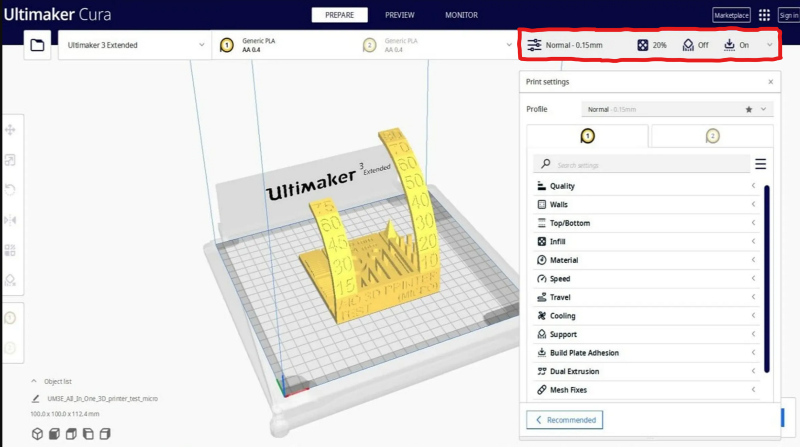
In the following, I will explain the choices for the settings shown on the right.
Quality (Layer height)
The layer height can be set to how many mm the Z-axis moves up for each print layer. A larger layer height provides higher print speeds at lower resolution. A lower layer height produces increased print time with higher print quality.
It should be noted that in theory, you should only set a layer height between 25% — and 75% of the diameter of the Nozzle. This would allow settings between 0.1mm and 0.3mm for a 0.4mm Nozzle. At a layer height of 0.1mm, slanted edges on objects are extremely smooth, at 0.3mm the individual layers can again be seen, and an unwanted rippled surface may result. However, it is important to note that, conversely, an object with a 0.3mm layer height is printed 3x as fast as an object with a 0.1mm layer height. In the next picture you can see an example of a print with high layer height and the rippled surface of the object.
For this reason, it must also be weighed up here whether a very high print quality really has to be achieved or whether time can be saved. Especially for objects with a wide surface over the x- and y-axis, this makes a lot of difference in speed.
From experience, I can say that the theoretical values of 0.3mm can be exceeded with a 0.4mm nozzle. For objects that are merely functional, prints with 0.35mm layer height are also possible if time is to be saved.
Walls
The wall count specifies how thick, and therefore stable, the exterior walls should be. A higher number counteracts small pressure defects that would be noticeable in the outer wall. However, it must be remembered that this also means that more time and material are needed in each layer to draw this additional wall. Before set 2 walls, which is also sufficient in most cases. From experience, it makes sense to set 3 walls for some objects, for example, if you want to print small holes for screws or the like in the object. This way the wall is strengthened, and it is prevented that this part of the object simply breaks out of the object or infill.
Material (Temperature)
In the Temperature section, the temperature of the nozzle and the print bed should be set. These depend on the filiament you are using. PLA for example can be printed at a relatively low temperature of 190–210 degrees. This is usually specified by the manufacturer of the filament you buy. For me, I usually print at an approximate temperature of 200 degrees. The print bed I have with PLA is always around 60 degrees hot, this has resulted at some point and I actually never change anything. However, everyone must find this out for themselves.
If you want to print other filiament such as, for example, ABS, you must note that this is printed with different temperatures. ABS is printed at temperatures above 220 degrees and the print bed should have a much higher temperature to ensure good adhesion. On the Internet, however, can be found for each Filiament a first indication of what temperature to set.
Speed
In the area of speed, one can make hardly defaults. Depending on the printer, different speeds can be entered here. However, you should always keep in mind that the faster you set the print speed, the worse the print quality will be.
Good initial values are 35 mm/s. It is important to know that by the input also further values are changed directly with a function. The walls are always printed automatically half as fast as the actual object. However, these values can also be changed later, which should be done in some cases. For example, for objects with a large volume, you often want to print the infill especially fast, because it doesn’t have to look nice, but it takes a lot of time. In turn, the walls, which are few in proportion, can be printed very slowly.
Again, I recommend using test prints to find out the right settings for your printer.
Infill:
The infill describes how much area or volume is printed inside the object. For material-saving reasons, only a certain percentage is printed inside the object. A solid plastic block is never really necessary and would use more material and take longer to print.

Most prints do not require more than 10–15% infill, more is only necessary if the 3D print has to withstand heavy loads. More infill always means longer print times and more material costs at the same time.
There are different shapes to choose how the infill can be printed inside, depending on which shape, this gives the object different stability.
I myself like to print with the infill tri-hexagons. But this is a matter of taste, and everyone should make his own experience with it by testing different.
Support
Support structures are a very important function. Since a print cannot be made in the air but must always be somehow connected to the print bed, support structures are needed for strong overhangs. You can set in Cura how dense this should be. The denser you set the support structure, the safer the print can print in case of an overhang, but it also means that the printing time and material costs increase again. In addition, it must be remembered that the support structure must often be removed relatively laboriously afterward, which is of course more work with a high density and thus more points of contact with the 3D object. Actually, one tries to avoid support structures already in the design as much as possible, because it leads to quality losses, but if there is no other way, it is always advisable to keep them relatively low.
If you have further questions about Cura and 3D printing, feel free to contact me. If you like my work, feel free to check out my other articles on similar topics.
Schreibe einen Kommentar