
Octoprint is software that allows you to control your 3D printer remotely from your network. The exact temperatures can be monitored and adjusted, as well as the next 3D model can be uploaded directly from the PC for printing. Alone that I can directly after creating, the GCODE load on the printer is a relief that I no longer want to miss. In the other case, you go to the 3D printer, get the SD card, run back to the PC, load it onto the SD card, and then back to the 3D printer. This also applies to preheating. With Octoprint, I give the printer the command to heat up beforehand, and when this is done, I go to the printer and briefly monitor the start of printing. Otherwise, you had to wait in front of the printer the entire time it was heating up and just watch it get warmer.
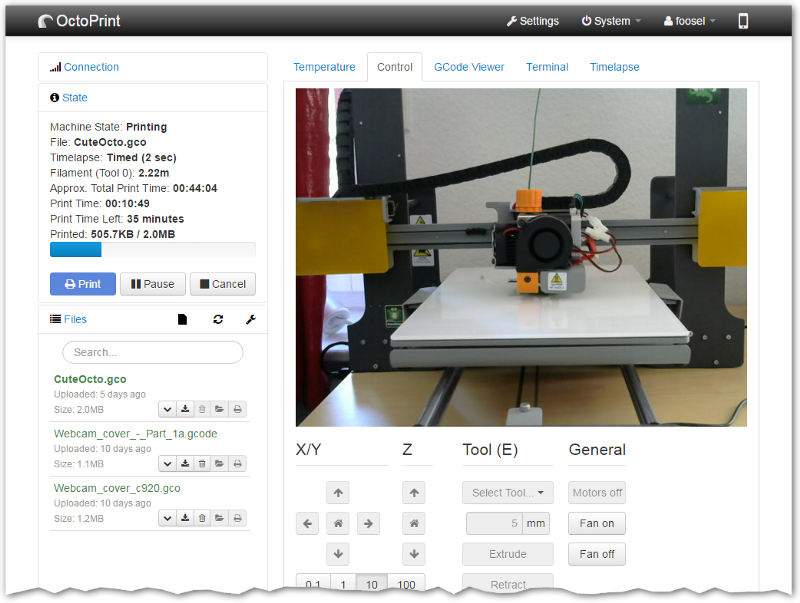
Another feature that saves a lot of walking is the ability to connect a camera directly to Octoprint to have a continuous Livestream of the print and monitor the print from the computer. A nice extra is the function of time-lapses, which are created automatically.
Below I show you how to install Ocotoprint on a Raspberry Pi and connect your 3D printer to it. You won’t want to miss this either!
What is needed?
- Raspberry Pi 3B+
- Micro SD card
- Touch Screen for Raspberry Pi
- Camera Module Raspberry Pi
- USB Cable (in my case a USB A to USB B)
Installation of Octoprint
The easiest way to install Octoprint is the official Raspberry Pi Imager. How to install the Raspbian operating system on a Raspberry Pi with it, I describe in another article.
To install Octoprint, the Octopi image can be selected directly. To do this, go to “Choose OS”, select “Other Specific Purpose OS” and then “3D printing”. There you can select the current version of Octopi.
In order to have direct access to the console of the Raspberry Pi after the installation and e.g. to install drivers for the touchscreen, the Wifi data should be stored directly in the settings and SSH should be activated.
To do this, press the shortcut “ctrl + shift + x” after selecting Octopi. A window will now open in which the first settings can be configured. In this window, it is important to activate SSH. Afterward, a username and password must be entered directly, which can be used to connect. The user name must remain “pi” and the password can be selected. Finally set up the Wifi by entering the SSID of the Wifi with a password. This way the Raspberry P can connect to the Wifi directly after startup and establish an SSH connection.
Now only the SD card has to be selected and the operating system has to be written to it. Octoprint is completely installed when the SD card is inserted into the Raspberry Pi.
Access to Octoprint via browser
After the Raspberry Pi has been started, Octoprint can now be accessed from any device on the network. This is done via the browser and the address:
http://octopi.local
A login page will appear where you can log in with the username “pi” and the password you just entered.
Access is now complete and you should be able to see the Octoprint user interface. To access the data of the printer, the Raspberry Pi can be connected with a USB cable to the main board of the 3D printer. In my case a USB A to USB B cable was necessary.
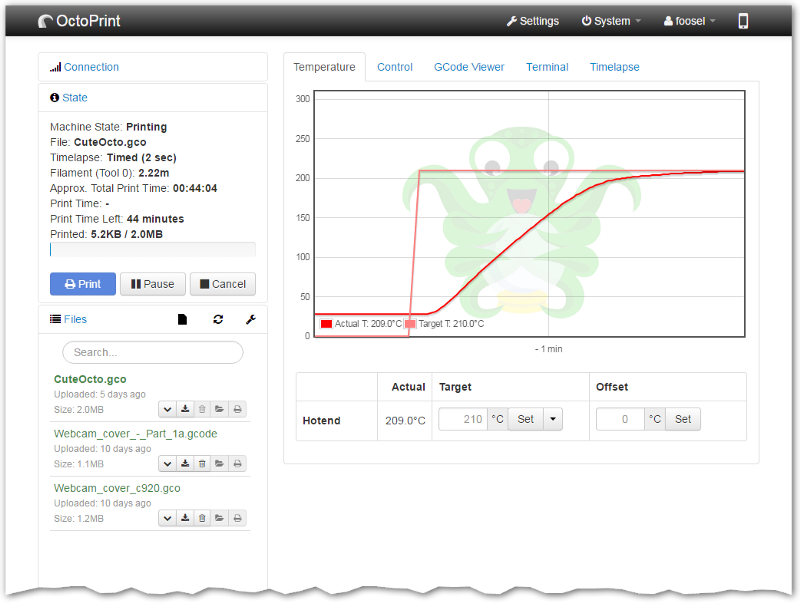
Once the Raspberry Pi is connected to the 3D printer, “connect” can be selected on the main page and an automatic connection is made. Afterward, the data like the temperature of the printer can be viewed and changed.
Connecting the touchscreen to the Raspberry Pi
The 3.5-inch touchscreen used here is a kind of direct extension, which can be plugged directly into the GPIOs of the Raspberry Pi. Afterward, the image of the Raspberry Pi should be displayed directly when you start it. If this is not the case and for example, only a white image is displayed, the drivers on the Raspberry Pi should be reinstalled.
To do this, we first connect to the previously set SSH connection and then enter the following commands in the console:
sudo rm -rf LCD-show
git clonehttps://github.com/goodtft/LCD-show.git
chmod -R 755 LCD-show
cd LCD-show/
sudo ./MHS35-show
Afterward, reboot the Raspberry Pi and the touchscreen should work fine.
Connection of the Camera Module and connection in Octoprint
This last point is probably the easiest. The Raspberry Pi has an extra connector for a ribbon cable for a camera module like this. When installing Octopi, this is activated by default. This means the camera just needs to be plugged in and after restarting the Raspberry Pi, the Livestream should be transmitted directly to the section Control. If the image is the wrong way around, this can be changed in Settings → Camera by rotating or even mirroring the image.
Further possibilities of Octoprint, like the time-lapse recording I will describe in a later article.
If you like my work, feel free to check out my other articles on similar topics.
Schreibe einen Kommentar